Kéfir de leche de coco
Nuestra receta de kéfir de leche de coco tiene una pequeña cantidad de azúcar para ayudar a fermentar la leche de coco en kéfir, pero es una excelente opción para aquellos que siguen una dieta cetogénica modificada. Use esto como su líquido en un cereal a base de coco hecho de hojuelas de coco sin azúcar, nueces picadas y un pequeño puñado de bayas frescas. Las bayas proporcionarán una pequeña cantidad de carbohidratos, pero ayudarán a equilibrar la comida y a darle una textura más satisfactoria.
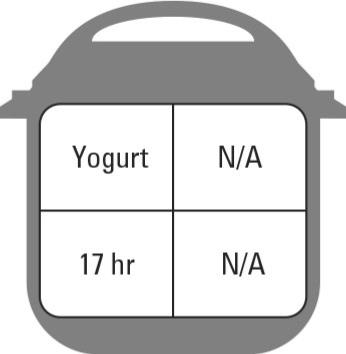
Función Instant Pot: yogur
Herramientas especiales: termómetro de lectura instantánea, frascos de vidrio para almacenamiento
Se adapta a dietas: sin gluten, cetogénica, vegana, vegetariana
Tiempo de preparación: 5 minutos.
Tiempo de cocción: 17 horas.
Rendimiento: 9 porciones
Ingredientes
Dos latas de 13.5 onzas de crema de coco sin azúcar
2 cucharadas de yogur de coco con cultivos activos vivos o 1 cápsula (vacía) de polvo probiótico
2 cucharadas de sirope de arce
2 cucharaditas de gelatina sin sabor
Direcciones
Agregue la crema de coco a la olla instantánea, cierre la tapa y presione el ajuste de yogur dos veces, hasta que la pantalla indique Hervir. Asegure la tapa.
Cuando la olla instantánea emita un pitido, retire la tapa y verifique la temperatura; debe leer al menos 180 grados. Si no es así, póngalo en Saltear y continúe calentando hasta que alcance los 180 grados.
En el fregadero de su cocina, haga un baño de hielo que se ajuste a su olla. Coloca la olla en el baño de hielo. Revuelva constantemente hasta que la leche alcance un rango de temperatura de 105 a 110 grados. Luego, agregue el yogur de coco o el polvo probiótico, el jarabe de arce y la gelatina. Continúe batiendo durante 1 minuto.
Seca el fondo de la olla. Devuélvalo a la olla instantánea y asegure la tapa.
Presione el ajuste Yogurt , establezca el tiempo en 16 horas y presione Iniciar.
Cuando el kéfir esté completo, agregue agua hirviendo a los frascos de almacenamiento. Deje reposar durante 5 minutos y luego vacíe el agua y deje que los frascos se sequen al aire. Vierta el kéfir en los frascos, asegure las tapas y guárdelo en el refrigerador hasta por 10 días o en el congelador hasta por 1 mes.
Cuanto más tiempo fermente el kéfir, es más probable que adquiera una consistencia fina parecida al yogur.
Evite el uso de miel como edulcorante. Las bacterias de la miel competirán con los probióticos.
Mezcle las bayas frescas después de que el kéfir esté completo y almacene hasta 3 días. Si prefiere un producto más espeso, intente batir con 1 cucharadita de harina de tapioca antes de refrigerar.
Huevos escalfados
Si eres fanático de los huevos, ¡aún podrás disfrutarlos en la dieta cetogénica! Los huevos son una opción rica en nutrientes que combina perfectamente con algunas de las verduras bajas en carbohidratos, como el brócoli picado, las espinacas y los champiñones. También puede agregar un poco de queso cheddar y carne picada para una comida más rica en proteínas. Nuestra receta de huevos escalfados es un gran lugar para comenzar.
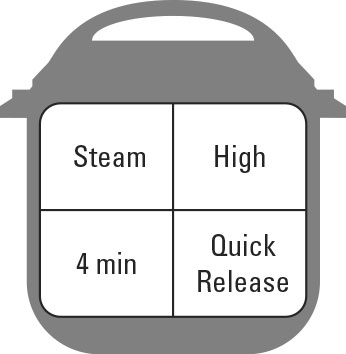
Función de olla instantánea: vapor (alto), liberación rápida
Herramientas especiales: moldes de silicona para muffins
Se adapta a dietas: Sin gluten, Ceto, Mediterránea, Vegetariana
Tiempo de preparación: ninguno
Tiempo de cocción: 4 minutos.
Rendimiento: 4 porciones
Ingredientes
4 huevos grandes
1 taza de agua
Direcciones
Rocíe 4 moldes de silicona para muffins con aceite en aerosol y rompa 1 huevo en cada soporte para muffins.
Coloque los moldes para muffins sobre el salvamanteles. Vierta el agua en la olla y baje el salvamanteles suavemente dentro de la olla. Asegure la tapa y ajuste a vapor (alto). Establezca el tiempo en 4 minutos.
Cuando termine de cocinar, presione Cancelar y Liberación rápida para ventilar.
Con una cuchara, saque con cuidado los huevos del forro.
Para obtener una yema de huevo más firme, aumente el tiempo de cocción a 5 minutos. Para un huevo escalfado más suave, disminuya el tiempo de cocción a 3 minutos.
Caldo de hueso de res
Evite pagar el alto precio por un caldo de huesos glorificado en su mercado local y haga el suyo en su Instant Pot. Nuestra receta de caldo de hueso de res es una excelente manera de aportar un rico sabor a las sopas bajas en carbohidratos que tienden a ocupar un lugar destacado en la dieta cetogénica. Además, el caldo de huesos es una excelente fuente de muchas vitaminas y minerales debido al hueso que se usa para darle sabor.
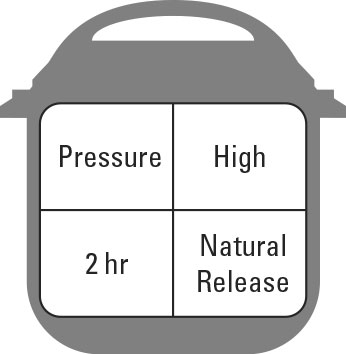
Función de olla instantánea: cocción a presión (alta), mantener caliente (encendido), liberación natural
Herramientas especiales: tarros de almacenamiento de vidrio
Se adapta a las dietas: sin gluten, cetogénica, mediterránea
Tiempo de preparación: ninguno
Tiempo de cocción: 2 horas.
Rendimiento: 10 porciones
Ingredientes
3 libras de huesos de res
3 zanahorias grandes, picadas
3 tallos de apio picados
1 cebolla grande picada
1/2 cucharadita de tomillo seco
1/4 taza de perejil
1 hoja de laurel
1/4 teaspoon peppercorns
2-1/2 quarts filtered water
Directions
Combine the bones, carrots, celery, onion, thyme, parsley, bay leaf, and peppercorns in the Instant Pot; then pour the filtered water over the top.
Secure the lid and set to Pressure Cook (High) and Keep Warm (On) or use the Soup/Broth setting. Set the time for 120 minutes using the +/– button and press Start.
When cooking completes, do a Natural Release of the pressure for 30 minutes.
Carefully remove the pot from the Instant Pot with oven mitts. Strain the stock with a colander into a clean bowl, and discard the bones and vegetables. Store in the refrigerator up to 5 days or in the freezer up to 4 months.
You can use onion skins, celery stems, and the tops of celery in stock.
To make a rich and robust beef stock roast the bones in the oven for an hour at 400 degrees.
Beef Bone Broth
Avoid paying the high price for a glorified bone broth at your local market, and make your own in your Instant Pot. Our Beef Bone Broth recipe is an excellent way to bring rich flavor to the low-carbohydrate soups that tend to be prominent on the keto diet. Plus, bone broth is a great source for many vitamins and minerals because of the bone used to flavor the broth.
Instant Pot function: Pressure Cook (High), Keep Warm (On), Natural Release
Special tools: Glass storage jars
Fits diets: Gluten-Free, Keto, Mediterranean
Prep time: None
Cook time: 2 hours
Yield: 10 servings
Ingredients
3 pounds beef bones
3 large carrots, chopped
3 celery stalks, chopped
1 large onion, chopped
1/2 teaspoon dried thyme
1/4 cup parsley
1 bay leaf
1/4 teaspoon peppercorns
2-1/2 quarts filtered water
Directions
Combine the bones, carrots, celery, onion, thyme, parsley, bay leaf, and peppercorns in the Instant Pot; then pour the filtered water over the top.
Secure the lid and set to Pressure Cook (High) and Keep Warm (On) or use the Soup/Broth setting. Set the time for 120 minutes using the +/– button and press Start.
When cooking completes, do a Natural Release of the pressure for 30 minutes.
Carefully remove the pot from the Instant Pot with oven mitts. Strain the stock with a colander into a clean bowl, and discard the bones and vegetables. Store in the refrigerator up to 5 days or in the freezer up to 4 months.
You can use onion skins, celery stems, and the tops of celery in stock.
To make a rich and robust beef stock roast the bones in the oven for an hour at 400 degrees.
Seasoned Pulled Pork
Our Seasoned Pulled Pork recipe is very rich, mainly from the fattier pork shoulder used in the recipe. The recipe suggests pairing this with a simple coleslaw, which traditionally is high in fat from mayonnaise. But if you’re on the keto diet, we recommend pairing this recipe with low-carbohydrate veggies to add more fiber to your diet and prevent some of the unfortunate side effects of a high-fat diet, like constipation.
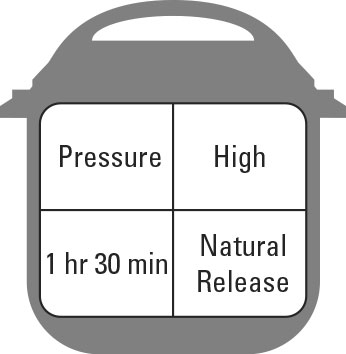
Instant Pot function: Pressure Cook (Normal), Keep Warm (Off), Natural Release
Special tools: Meat thermometer
Fits diets: Gluten Free, Keto
Prep time: 5 minutes
Cook time: 1-1/2 hours
Yield: 12 servings
Ingredients
2 tablespoons blackened seasoning
2 teaspoons garlic powder
1 teaspoon onion powder
1 teaspoon paprika
1/2 teaspoon ground black pepper
1/4 teaspoon salt
4 pounds bone-in pork shoulder
2 cups chicken broth
1 bay leaf
Directions
In a large bowl, mix together the blackened seasoning, garlic powder, onion powder, black pepper, and salt. Add the pork shoulder, and rub the spices into the pork shoulder, covering the entire surface area.
Place the seasoned pork shoulder into the inner pot of the Instant Pot. Top with the remaining spices from the bowl. Pour the chicken broth over the top, add in the bay leaf, and secure the lid.
Set the valve to Sealing and select Pressure Cook (Normal) and Keep Warm (Off), using the +/– button to set the time to 90 minutes.
The final internal temperature of the pork should reach 145 degrees. When cooking completes, do a Natural Release of the pressure for 25 minutes.
Switch the valve to Venting and allow the remaining pressure (if any) to release. Remove the lid and discard the bone, bay leaf, and any excess visible fat from the inner pot.
Using two large forks, begin to shred the pork directly into the broth and spice mixture. Serve immediately.
For a smaller pork shoulder, adjust the time accordingly with the estimate of 22 minutes per pound.
Serve with cabbage slaw on top of a Hawaiian sweet roll or on its own over a salad for a keto-friendly option.
Switch up your seasonings and add your favorite spice blend! If you’re using barbecue sauce, wait until the final stages of serving to add.
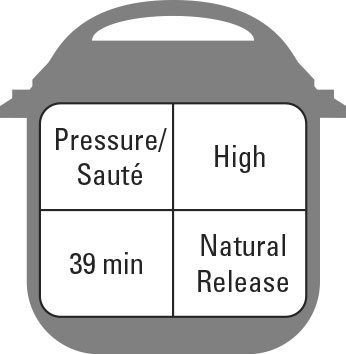
Carne Guisada
Though Carne Guisada is traditionally served with tortillas, to remain keto compliant you can serve it alongside some butterleaf lettuce or spoon it into a halved avocado. Avocados are a nutrient-rich food that helps to provide satiety alongside the better-for-you fats that aren’t found in meats.
Instant Pot function: Pressure Cook (High), Keep Warm (On), Natural Release, Sauté (High)
Fits diets: Gluten-Free, Keto
Prep time: 10 minutes
Cook time: 39 minutes
Yield: 8 servings
Ingredients
3 pounds beef stew meat, cubed
2 cups beef stock
2 tablespoons tomato paste
1 tablespoon dried oregano
1 teaspoon cumin
4 garlic cloves, chopped
1 large onion, chopped
1 large green bell pepper, chopped
1-1/2 teaspoons salt
2 tablespoons cornstarch
2 tablespoons cold water
Directions
Place the cubed stew meat into the Instant Pot and add the beef stock, tomato paste, oregano, cumin, cloves, onion, bell pepper, and salt. Stir to combine the ingredients, and secure the lid.
Press Pressure Cook (High) on the Instant Pot, adjust the time to 35 minutes using the +/– button, with Keep Warm (On). Do a Natural Release of the pressure for 15 minutes.
Using a slotted spoon, remove the meat to a serving bowl.
In a small bowl, whisk together the cornstarch and water.
Press Sauté (High) and, while whisking, add in the cornstarch slurry. Bring the sauce to a low simmer about 4 minutes; then ladle over the meat and serve.
If you prefer a smoother gravy, use an immersion blender or regular blender to blend the gravy before serving. Work in small batches with a towel over the top of the blender. Serve with flour tortillas or over rice, mashed potatoes, or cauliflower rice.
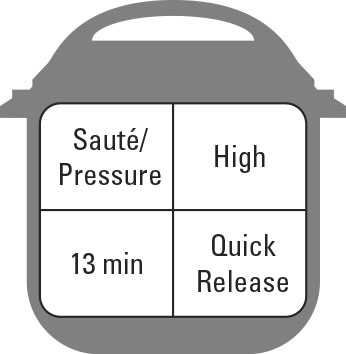
Korean Beef Bulgogi Bowl
Our Korean Beef Bulgogi Bowl recipe does call for sugar, but to remain keto compliant, you can substitute the brown sugar with stevia or monk fruit. This delicious recipe can certainly fit into your low-carb meal plan when paired with a simple cauliflower rice. Cauliflower rice is a freezer-friendly staple, so you won’t have to spend hours in the kitchen ricing your own.
Instant Pot function: Sauté (High), Pressure Cook (High), Keep Warm (Off), Quick Release
Prep time: 5 minutes
Cook time: 13 minutes
Yield: 4 servings
Ingredients
1/3 cup filtered water
1/4 cup low-sodium soy sauce
2 tablespoons rice wine vinegar
2 tablespoons packed brown sugar
2 teaspoons sesame oil
1 teaspoon ground ginger
2 tablespoons cornstarch
1-1/4 pounds lean ground beef
1/2 small onion, chopped
1 teaspoon minced garlic
2 cups chopped bell peppers
2 cups cooked brown rice, divided
2 cups Basic Brown Rice
1 stalk of green onion, chopped, for garnish
1/2 teaspoon red pepper flakes, for garnish
4 teaspoons Sriracha, for garnish
Directions
In a small bowl, whisk together the water, soy sauce, rice wine vinegar, brown sugar, sesame oil, ginger, and cornstarch. Set aside.
Press Sauté (High) on the Instant Pot and add the ground beef. When the beef begins to brown (about 3 minutes), add in the onion, garlic, and bell peppers. Continue to cook for 5 minutes. When finished, press Cancel.
Stir in the sauce and select Pressure Cook (High) and Keep Warm (Off), adjust the timer to 5 minutes using the +/– button, and secure the lid. Ensure the vent is set to Sealing.
When the cooking completes, press Cancel, remove the lid, stir, and portion into 4 bowls, served over 1/2 cup of Brown Jasmine Rice. Garnish as desired with green onion, red pepper flakes, and Sriracha.
To make the recipe keto compliant, substitute a sugar replacement for the brown sugar. Because sugar substitutes are sweeter than sugar, use half the amount. Then serve with cauliflower rice.
Use a tamari sauce in place of soy to make the recipe gluten-free.
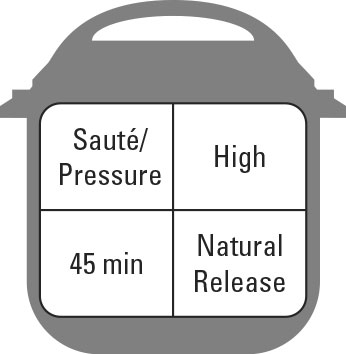
Turkey and Mushroom Meatloaf
Nothing is worse than showing up to an event without something to eat! That’s why our prep-ahead Turkey and Mushroom Meatloaf can be a keto follower’s best friend for a weekend away. Going camping? Cook ahead and modify by using an almond flour in place of the breadcrumbs. Reheat to 165 degrees (yes, you can do this over an open flame in the woods), and you’ll have a nourishing meal (not out of a package) in a matter of minutes.
Instant Pot function: Sauté (High), Pressure Cook (High), Keep Warm (Off), Natural Release
Special tools: Three 4-inch loaf pans
Fits diets: Gluten-Free, Keto, Mediterranean
Prep time: 10 minutes
Cook time: 45 minutes
Yield: 6 servings
Ingredients
1 teaspoon extra-virgin olive oil
1/4 small onion, chopped
1 teaspoon minced garlic
3 large white mushrooms, finely diced
1 pound lean ground turkey
1 large egg
1 teaspoon Italian seasoning
1/2 teaspoon ground black pepper
1/8 teaspoon salt
1 tablespoon fresh chopped basil
1/2 cup whole-wheat breadcrumbs
6 tablespoons barbecue sauce
1 cup water
Directions
Press Sauté (High) on the Instant Pot, and place the oil in the inner pot. Add the onion, garlic, and mushrooms. Sauté for 10 minutes, until the mushrooms are tender. Press Cancel.
In a large bowl, combine the mushroom mixture with the ground turkey. Add in the egg, Italian seasoning, pepper, salt, basil, and breadcrumbs. Mix until uniformly combined. Liberally spray three 4-inch aluminum loaf pans with cooking spray. Divide the turkey mixture evenly into the loaf pans and top each loaf with 2 tablespoons of barbecue sauce.
Cover the loaf pans with aluminum foil. Rinse the inner pot and dry the outside. Place the insert back into the Instant Pot, and pour the water in. Position the metal trivet on the bottom and place 2 loaf pans on top; place the remaining loaf pan horizontally across the bottom pans. Close the lid and set to Sealing.
Press Pressure Cook (High) and Keep Warm (Off), and use the +/– button to set the timer to 35 minutes. When cooking completes, do a Natural Release of the pressure for 5 minutes, and then use Quick Release to remove the remaining pressure.
Remove the foil from the loaf pans, slice and serve.
These make an excellent freezer-friendly meal to enjoy later. Just reheat until the internal temperature of the meatloaf is 165 degrees.
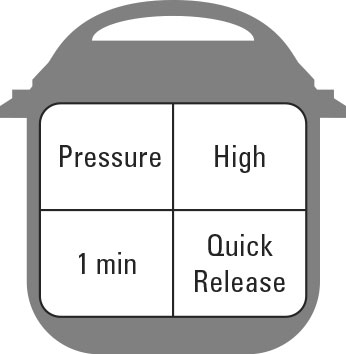
Garlic Green Beans and Tomatoes
Green beans are non-starchy vegetables (along with artichokes, bok choy, cabbage, celery, mushrooms, and spinach — think of vegetables that grow aboveground.) Though tomatoes are a bit higher in carbohydrates, when eaten in moderation, they can absolutely fit into a keto diet! Pair our Garlic Green Beans and Tomatoes recipe with any meat, and we promise, you’ll be satiated and satisfied!
Instant Pot function: Pressure Cook (High), Keep Warm (On), Quick Release
Fits diets: Gluten-Free, Mediterranean, Vegan, Vegetarian
Prep time: 5 minutes
Cook time: 1 minute
Yield: 6 servings
Ingredients
1/2 cup water
1 pound fresh green beans, ends removed
2 cloves garlic, minced
1 lemon, zested and juiced
1/4 cup extra-virgin olive oil
1/2 teaspoon salt
1/4 teaspoon pepper
1/8 teaspoon onion powder
1 small red onion, thinly sliced
1 cup halved cherry tomatoes
Directions
Place the water into the inner pot of the Instant Pot. Add the green beans. Cover with the lid, set the valve to Sealing, and press Pressure Cook (High) and Keep Warm (Off). Adjust the time to 0 minutes using the +/– button.
Meanwhile, in a small bowl, whisk together the garlic, lemon zest, lemon juice, olive oil, salt, pepper, and onion powder.
When the cooking completes, do a Quick Release, and immediately place the green beans in an ice bath for 1 minute. (This helps retain the bright green color and halts the cooking process.)
In a serving bowl, toss the green beans, red onions, and cherry tomatoes together. Drizzle with the dressing, toss, and serve.
Use fresh asparagus instead of green beans for a seasonal twist.

1
Cheese Fondue with Jalapeños
Our Cheese Fondue with Jalapeños is a party-friendly appetizer that you and your friends on the keto bandwagon can enjoy! Serve this recipe alongside celery sticks, cauliflower, radishes, or even rolled meats. Remember, though: This is a pretty high-sodium dish, so be mindful of your portions and drink lots of water.
Instant Pot function: Pressure Cook (High), Keep Warm (Off), Quick Release
Special tools: Instant Pot–friendly casserole dish
Fits diets: Gluten-Free, Keto, Vegetarian
Prep time: 5 minutes
Cook time: 10 minutes
Yield: 8 servings
Ingredients
One 12-ounce can cheese soup
1/2 cup plain Greek yogurt
8 ounces shredded reduced-fat cheddar cheese
One 8-ounce canned diced jalapeño
1/2 teaspoon garlic powder
1 tablespoon yellow mustard
1/2 teaspoon paprika
1/4 teaspoon ground black pepper
1/4 teaspoon salt
1-1/2 cups water
1/4 cup chopped parsley, for garnish
Crusty bread, for serving
Tortilla chips, for serving
Directions
In a medium bowl, mix the cheese soup, yogurt, cheddar cheese, jalapeño, garlic powder, yellow mustard, paprika, pepper, and salt. Pour into an Instant Pot–friendly casserole dish and cover tightly with foil.
Press Pressure Cook (High) and Keep Warm (Off), and set the timer for 10 minutes using the +/– button.
Add the water to the base of the metal pot insert and place the metal trivet over the water. Position the pan on top of the trivet and secure the lid. Set the valve to Sealing.
When the cooking completes, press Cancel. Use Quick Release to remove the pressure.
Carefully remove the pan from the Instant Pot and discard the foil. Stir the cheese fondue one more time, and garnish with parsley.
Serve with crusty bread or tortilla chips, or use as a topping for tacos, nachos, or burgers.
If you prefer less-spicy foods, you can omit the jalapeños.
1
Cheese Fondue with Jalapeños
Our Cheese Fondue with Jalapeños is a party-friendly appetizer that you and your friends on the keto bandwagon can enjoy! Serve this recipe alongside celery sticks, cauliflower, radishes, or even rolled meats. Remember, though: This is a pretty high-sodium dish, so be mindful of your portions and drink lots of water.
Instant Pot function: Pressure Cook (High), Keep Warm (Off), Quick Release
Special tools: Instant Pot–friendly casserole dish
Fits diets: Gluten-Free, Keto, Vegetarian
Prep time: 5 minutes
Cook time: 10 minutes
Yield: 8 servings
Ingredients
One 12-ounce can cheese soup
1/2 cup plain Greek yogurt
8 ounces shredded reduced-fat cheddar cheese
One 8-ounce canned diced jalapeño
1/2 teaspoon garlic powder
1 cucharada de mostaza amarilla
1/2 cucharadita de pimentón
1/4 de cucharadita de pimienta negra molida
1/4 cucharadita de sal
1-1 / 2 tazas de agua
1/4 taza de perejil picado, para decorar
Pan crujiente, para servir
Chips de tortilla, para servir
Direcciones
En un tazón mediano, mezcle la sopa de queso, el yogur, el queso cheddar, el jalapeño, el ajo en polvo, la mostaza amarilla, el pimentón, la pimienta y la sal. Vierta en una cacerola apta para olla instantánea y cubra bien con papel de aluminio.
Presione Cocción a presión (alta) y Mantener caliente (apagado), y configure el temporizador para 10 minutos usando el botón +/–.
Agregue el agua a la base del inserto de olla de metal y coloque el salvamanteles de metal sobre el agua. Coloque la sartén sobre el salvamanteles y asegure la tapa. Ponga la válvula en Sellado.
Cuando termine la cocción, presione Cancelar. Utilice Quick Release para eliminar la presión.
Retire con cuidado la sartén de la olla instantánea y deseche el papel de aluminio. Remueve la fondue de queso una vez más y decora con perejil.
Sirva con pan crujiente o chips de tortilla, o úselo como aderezo para tacos, nachos o hamburguesas.
Si prefiere alimentos menos picantes, puede omitir los jalapeños.
1
Nueces y anacardos especiados
¿Necesitas satisfacer a los golosos, pero reconoces que ceto significa decir no a tus postres favoritos? Entonces nuestra receta de nueces especiadas y anacardos es una excelente opción. Las nueces son ricas en ácidos grasos omega-3, una grasa saludable para el corazón que ha demostrado tener muchos efectos prometedores en el cuerpo. Al preparar esta receta, puede intercambiar el arce con sustitutos del azúcar comúnmente aprobados en la dieta ceto, como stevia, fruta de monje, eritritol o xilitol.
Sin embargo, una advertencia: si eres nuevo en los sustitutos del azúcar, ten en cuenta las porciones y observa cómo responde tu cuerpo. Algunas personas informan problemas de estómago al comer sustitutos del azúcar.
Función de olla instantánea: saltear (alto), cocción a presión (alto), mantener caliente (apagado), liberación rápida
Se adapta a dietas: Sin gluten, Ceto, Mediterránea, Vegana, Vegetariana
Tiempo de preparación: ninguno
Tiempo de cocción : 26 minutos.
Rendimiento: 12 porciones
Ingredientes
1/4 taza de jarabe de arce puro
1 cucharadita de extracto de vainilla
1 cucharadita de canela en polvo
1 cucharadita de cúrcuma molida
1/2 cucharadita de nuez moscada molida
1/4 cucharadita de pimienta de cayena
2 tazas de nueces en mitades, crudas
1 taza de anacardos, crudos
1/3 taza de agua
1/2 taza de arándanos secos
2 cucharadas de ajonjolí
1/2 cucharadita de sal
Direcciones
Presione Saltear (alto) en la olla instantánea. A la olla de metal, agregue el jarabe de arce, la vainilla, la canela, la cúrcuma, la nuez moscada y la pimienta. Revuelva y agregue lentamente las nueces y anacardos, y cocine durante unos 4 minutos.
Presione Cancelar . Agrega el agua, revuelve y cierra la tapa. Coloque la válvula en Sellado, presione Cocción a presión (alta ) y Mantener caliente (Apagado), y configure el temporizador en 8 minutos usando el botón +/–. Mientras tanto, precalienta el horno a 300 grados.
Cuando termine la cocción, presione Cancelar y use Liberación rápida para eliminar la presión.
Cubra una bandeja para hornear con borde con papel pergamino y rocíe con aceite en aerosol. Agregue los arándanos, las semillas de sésamo y la sal a la olla y combine con las nueces.
Extienda la mezcla de nueces sobre la bandeja para hornear. Coloque en el horno y hornee por 8 minutos, revuelva y luego hornee los 6 minutos restantes. Retirar del horno y dejar enfriar durante 10 minutos. Atender.
Para que esta receta cumpla con la dieta cetogénica, use de 2 a 3 gotas de fruta monje o extracto de stevia en lugar del jarabe de arce puro.
Compre nueces crudas de los contenedores a granel y guárdelas en el congelador para una frescura óptima.
Use almendras y nueces para las nueces y cambie los trozos de mango seco por los arándanos.